|
|
|
|
|
|
|
|
|
|
|
|
|
|
|
|
|
|
|
|
|
|
|
|
|
|
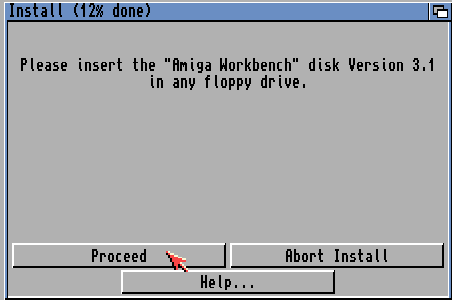
|
|
Chapter 2 - Formatting the HD and Installing Workbench 3.1
If you have quit WinUAE after the first chapter then re-launch the
program, left click the config you made and click the Load button.
1. Select the Floppies tab.
2. On the DF0: slot click the ‘...’ button on the right and select your
Install A.D.F (Amiga Disk File).
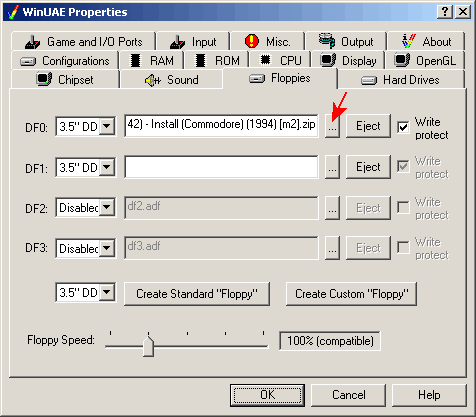
3. Then Click OK to start the emulation.
4. When the Amiga has booted you should see Ram Disk, Programs,
Install3.1 and DH0:NDOS (this is your new blank HD)
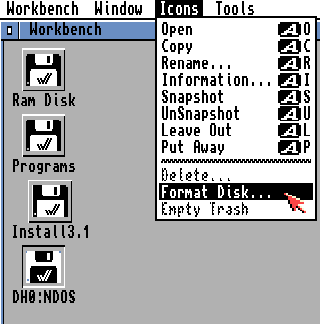
5. Left click once on DH0:NDOS to select.
6. Now go to the top of the screen and hold your right mouse button down.
7. Hover your mouse over Icons and then to Format Disk...
8. When Format Disk... is highlighted let go of the right mouse button.
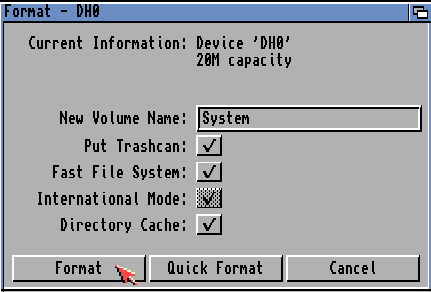
9. In New Volume Name: box delete the word Empty and put System
10. Tick Fast File System, Directory Cache, and Put Trashcan (this one is
optional).
11. Now left click on Format button to proceed.
12. Click the next 2 Format buttons to start the formatting.
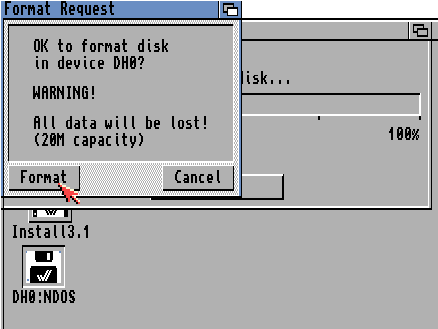
13. Format should now start.
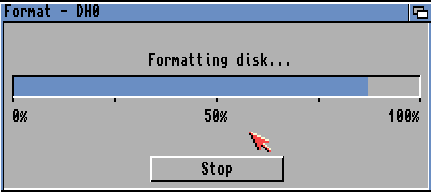
14. When finished the DH0:NDOS will change to System. (Congratulations
you now have a formatted hard disk)
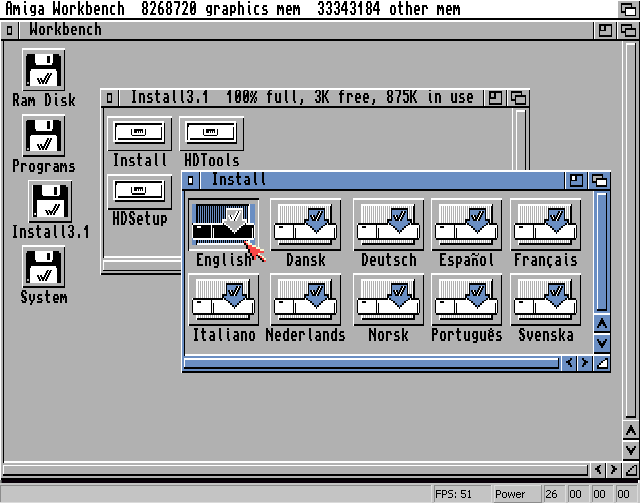
15. Now double click the Disk icon called Install3.1 (a window will open)
16. Next double click the drawer called Install (another window will
open)
17. Then double click on English (or your first speaking language)
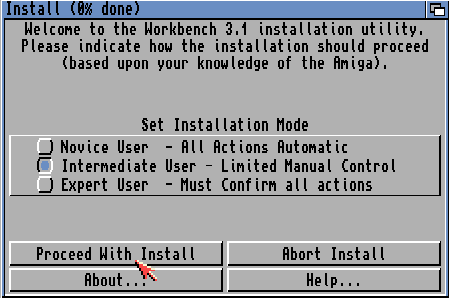
18. The setup program will launch. Click ‘proceed’ button then click
‘Install Release 3.1’ button.
19. Under Set Installation Mode select ‘Intermediate User’ and then click
the ‘Proceed With Install’ button
20. On the next screen leave the options as they are (Should have
Installation option set to ‘Install for real’ and Log all actions set to
‘none’.) and click the ‘Proceed’ button.
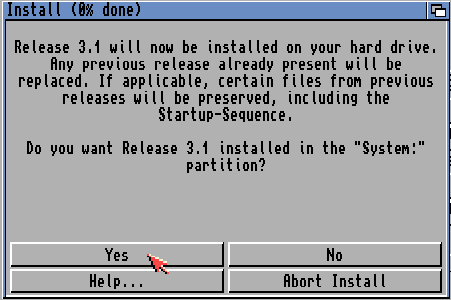
21. You should be asked, "Do you want Release 3.1 installed in the
"System:" partition?" Click the ‘Yes’ button.
22. On the next screen, if you speak more than one language, you can
select which languages you want to Install. When happy click the ‘Proceed’
button.
23. Next screen will ask you what type of printer you have. If it’s on
the list select it and click the ‘Proceed’ button.
24. Next screen will ask which keymaps to install. Select British and
American (if you live in one of the places listed then also select that one) and
then click the ‘Proceed’ button.
25. When this screen shows press F12 on you keyboard.
26. Now on the floppies tab select the ‘...’ button on the DF1: slot
and select your Workbench adf (if TOSEC named it could be called ‘Workbench 3.1
(40.42) - Boot (Commodore) (1994) [m2]’). Click Open and then the OK button to
return back to emulation.
27. When you see the Workbench icon show on the screen it should continue
automatically. If it does not continue automatically then Click the ‘Proceed’
button.
28. When asked to insert Amiga Locale hit F12 on you keyboard, on the
floppies click Eject button on the DF1: slot and select the Locale disk (if
TOSEC named it could be called ‘Workbench 3.1 (40.42) - Locale (Commodore)
(1994) [m2]’) using the ‘...’ button. Click Open and then the OK button to
return back to emulation.
29. Wait a few seconds. Click ‘Proceed’ button if it does not continue
automatically.
30. When asked to insert Amiga Extras hit F12 on you keyboard again, on
the floppies click Eject button on the DF1: slot and select the Extras disk (if
TOSEC named it could be called ‘Workbench 3.1 (40.42) - Extras (Commodore)
(1994) [m2]’) using the ‘...’ button. Click Open and then the OK button to
return back to emulation.
31. Wait a few seconds. Click ‘Proceed’ button if it does not continue
automatically.
32. When asked to insert Amiga Fonts, yes you guessed it, you hit F12 on
you keyboard again, on the floppies click Eject button on the DF1: slot and
select the Fonts disk (if TOSEC named it could be called ‘Workbench 3.1 (40.42)
- Fonts (Commodore) (1994) [m2]’) using the ‘...’ button. Click Open and then
the OK button to return back to emulation.
33. Wait a few seconds. Click ‘Proceed’ button if it does not continue
automatically.
34. When asked to insert Amiga Storage hit F12 on you keyboard again, on
the floppies click Eject button on the DF1: slot and select the Extras disk (if
TOSEC named it could be called ‘Workbench 3.1 (40.42) - Storage (Commodore)
(1994) [m2]’) using the ‘...’ button. Click Open and then the OK button to
return back to emulation.
35. Wait a few seconds. Click ‘Proceed’ button if it does not continue
automatically.
36. When the screen below shows, hit F12 and click both Eject buttons on
the DF0: and DF1: slots. Click OK button to return back to emulation.
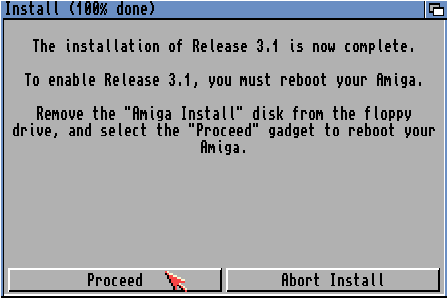
37. Now wait a few seconds and then Click ‘Proceed’ button to reboot.
38. Well done! :) You now have Workbench 3.1 Installed your virtual hard
disk. I think you agree it looks a bit drab, there is no need to worry, in the
next few chapters we will show you the art of customisation.
|
|
All chapters only on this page are Copyright (c) Paul, The Green Amiga Alien and should not be copied, altered or uploaded to another site without the authors permission. Web site design Copyright (c) CPC464.