|
| |||||
|
| |||||
Chapter 2 - Installing Workbench 1.3
If you have quit WinUAE after the first chapter then re-launch the program,
left click the config you made and click the Load button.
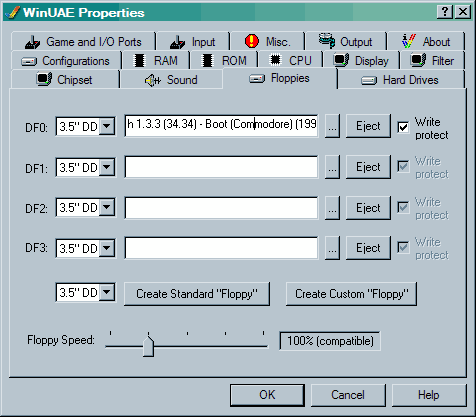
1. Select the Floppies tab.
2. On the DF0: slot click the ‘...’ button on the right and select your
Workbench v1.3.3 A.D.F (Amiga Disk File).

3. Then Click OK to start the emulation.
4. When the Amiga has booted you should see Ram Disk, WB1.3 (this is your
new blank HD) and Workbench1.3

5. Double click on Workbench1.3
6. Double click on shell
7. Type in: COPY DF0: WB1.3: ALL and press Return/Enter.
8. After all files have finished being copied then Type in: endcli
and press Return/Enter.
9. Now press F12, go to floppies tab and click Eject in DF0
slot.
10. Click OK button to return back to emulation.
11. Now restart the Amiga by holding down the 3 keys
CTRL + INSERT + HOME
Or in newer versions of WinUAE press CTRL + LEFT WINDOW + RIGHT WINDOW
keys
End.
If you are using an hdf then please ignore all the text below.
Troubleshooting:
Help! I am trying to copy the workbench 1.3 files to my wb1.3 hard disk
directory, but after following this step: “Type in: COPY DF0: WB1.3: ALL and
press Return/Enter.” during the coping process winuae crashes.
Ok then try this other tried and tested method. N.b. you will need a kickstart
2.x or 3.x rom file for this to work.
If you have quit WinUAE after the first chapter then re-launch the program, left
click the config you made and click the Load button.
1. Go to the ROM tab and click ‘...’ button and set the
path to your kick-start 2.x or 3.x ROM File.
2. Select the Floppies tab.
3. On the DF0: slot click the ‘...’ button on the right and
select your Workbench v1.3.3 A.D.F (Amiga Disk File).
4. Then Click OK to start the emulation. When the Amiga has booted
you should see Ram Disk, wb1.3 (this is your blank HD directory) and
Workbench1.3
5. Double click on wb1.3 to open (Move the window up to the top of
screen)
6. Double click on Workbench1.3 (Move the window down to the
bottom of screen)
7. Now go to the top of the screen and hold your right mouse
button down.
8. Hover your mouse over window > Show > All files then let go
9. Now go to the top of the screen again and hold your right mouse
button down.
10. Hover your mouse over select contents then let go
11. Hold the shift key down.
12. Drag and drop by clicking and holding mouse on any icon (top left
icon in workbench1.3 disk window is best)
13. Drag into wb1.3 (your open hd directory window) and let go of
mouse.
14. Now press F12, go to floppies tab and click Eject
in DF0: slot.
15. Goto ROM tab, swap back to 1.3 kickstart rom
16. Goto MISC tab, click ‘Reset Amiga’
17. Click OK button, Workbench 1.3 should now boot from the hd
directory.
|
Method 1 |
Method 2 |
All chapters only on this page are Copyright (c) Paul, The Green Amiga Alien and should not be copied, altered or uploaded to another site without the authors permission. Web site design Copyright (c) CPC464.