|
|
|
|
|
|
|
|
|
|
|
|
|
|
|
|
|
|
|
|
|
|
|
|
|
|
|
|
Part 2 of Chapter 1: Method 2 - Setting up & Configuring WinUAE for WB1.3 on HDF
32. First Quit WinUAE by pressing F12, then go to the misc tab
and click quit winuae. (Called 'Quit' in Winuae 0.8.22r5)
33. Next, via windows, make a new directory in C:\Program Files\Winuae\Hard
Disks and name it i.e. temp
34. Now re-launch the program, left click the config you made and click
the Load button, then go back to the Hard Drives tab.
35. Click Add Directory...
36. In Volume Name: type in temp
37. In Path type C:\Program Files\WinUAE\Hard Disks\temp (or click
‘...’ button and point to this directory) And then click OK.
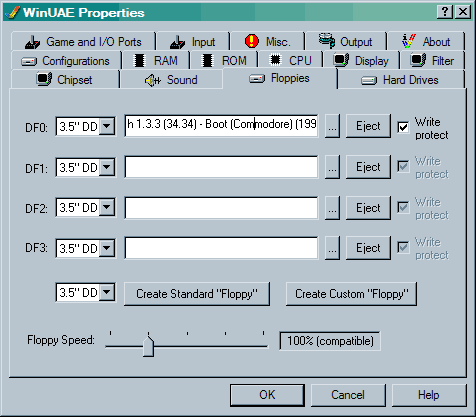
38. Select the Floppies tab.
39. On the DF0: slot click the ‘...’ button on the right and select your
Workbench v1.3.3 A.D.F (Amiga Disk File).
40. Then Click OK to start the emulation.
41. When the Amiga has booted you should see Ram Disk, temp (this is a
blank HD directory) and Workbench1.3
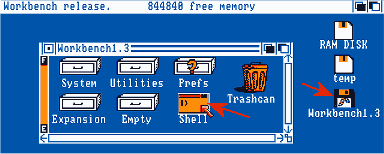
42. Double click on Workbench1.3
43. Double click on shell
44. Type in: COPY L:fastfilesystem temp: and press Return/Enter.
45. Then Type in: endcli and press Return/Enter.
46. Quit WinUAE by pressing F12, then go to the misc tab and click
'Quit Winuae' button. (Called 'Quit' in Winuae 0.8.22r5)
47. Now via windows, go to the directory in C:\Program Files\Winuae\Hard
Disks\temp and move the fastfilesystem file to your kickstarts
folder (by selecting the fastfilesystem file, go to edit>cut on
the menu, go to the kickstarts i.e. C:\Program Files\Winuae\kickstarts
directory then go to edit>paste on the menu.)
48. Now re-launch the Winuae program, left click the config you made and
click the Load button.
49. Select the Floppies tab.
50. On the DF0: slot click the ‘...’ button on the right and select your
Workbench v1.3.3 A.D.F (Amiga Disk File).
51 Go to the ROM tab and click ‘...’ button and set the path to
your kick-start 2.x ROM File. Then Click OK to start the emulation.
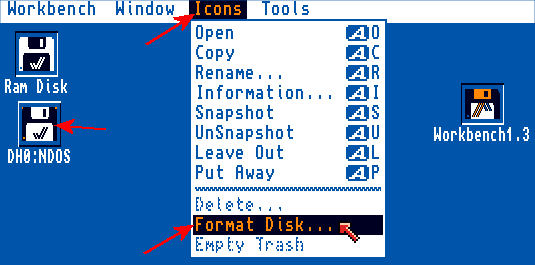
52. When the Amiga has booted you should see Ram Disk, DH0:NDOS (this is
your blank HDF) and Workbench1.3
53. Left click once on DH0:NDOS to select.
54. Now go to the top of the screen and hold your right mouse button
down.
55. Hover your mouse over Icons and then to Format Disk...
56. When Format Disk... is highlighted let go of the right mouse
button.
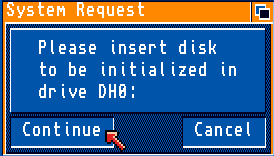
57. When Please insert disk to be initialized in drive in DH0: shows, click Continue.
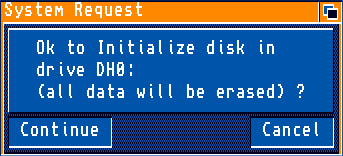
58. When Ok to Initialize disk in drive DH0: (all data will be erased) ? shows, click Continue.
59. Then go to the top of the screen and hold your right mouse button
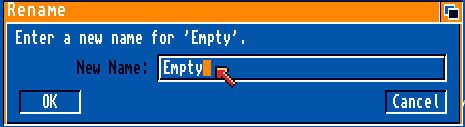
down. Hover your mouse over Icons and then to Rename... When
Rename... is highlighted let go of the right mouse button.
60. Delete the word Empty and type in WB1.3 then click ok.
61. Press F12 Go to the ROM tab and click ‘...’ button and set the
path to your kick-start 1.3 ROM File.
62. Go to the Misc tab and click on Reset Amiga.
63. Now you are ready to follow
Chapter 2
|
|
All chapters only on this page are Copyright (c) Paul, The Green Amiga Alien and should not be copied, altered or uploaded to another site without the authors permission. Web site design Copyright (c) CPC464.