|
|
|
|
|
|
|
|
|
|
|
|
|
|
|
|
|
|
|
|
|
|
|
|
|
|
|
|
Chapter 11 - How to Install Games using the WHDLoad Installs
In this chapter I will first show you how to add an HD-Games drive to your
Workbench setup then give an example of how to install a WHDLoad game. (I will
use Alfred Chicken as the example)
How to add an HD-Games drive:
a. In windows go into C:\winuae\Hard Disks then go to File > New > Folder
and type in: HD-Games as the directory name.
b. Now launch the WinUAE program, left click the config you made, click
the Load button.
c. Next go to the Hard Drives tab and Left Click Add Directory...
d. In Volume Name: type in HD-Games
e. In Path type C:\Program Files\WinUAE\Hard Disks\HD-Games (or click
‘...’ button and point to this directory) and then click OK. See Chapter 1
for the screen captures
f. Now go back to the Configurations tab
g. Left Click once on the config you made in Chapter 1 to select (i.e.
Amiga 1200 WB3.1) and click the Save button.
How to install a WHDLoad game
1. Go to
http://www.whdload.de/download.html and download the game patch Installs
and save them to C:\Program Files\WinUAE\Hard Disks\Programs
2. If you have quit WinUAE, then re-launch the program, left click the
config you made, click the Load button and click OK to start emulation.
3. When workbench is booted you should see Ram Disk, HD-Games, Programs
and System. Double click System, double click the next System
drawer in the window that opened, and then double click the Shell program
to open Amiga DOS.
4. Type in:
lha x Programs:AlfredChicken.lha Programs: and press Return/Enter
5. Now close shell (type endcli and press Return/Enter) then Double Click
Programs and on AlfredChickenHD drawer directory.
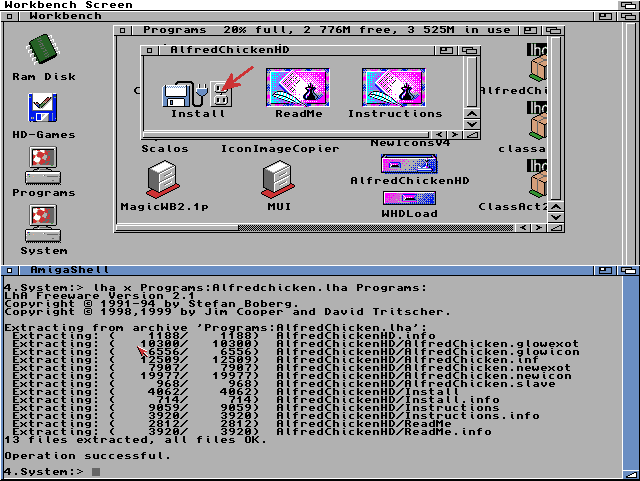
6. Now double click on Install
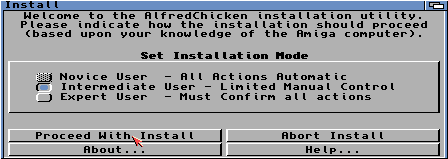
7. Make sure Intermediate User is selected and then Click ‘Proceed With
Install.’ (in this install you can see the Novice User is greyed out and
unavailable, this is normal, so don’t worry)
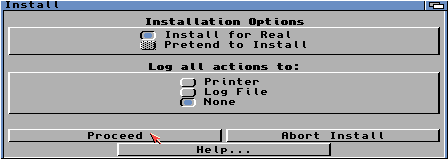
8. Make sure Install for Real and None are selected and then Click ‘Proceed’. (You can see the Pretend to Install is also greyed out and unavailable, again this is normal, so don’t worry)
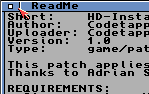
9. The ReadMe will now open, so click top-left square to close it.
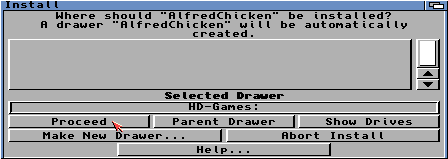
10. Left click on DH2: HD-Games:
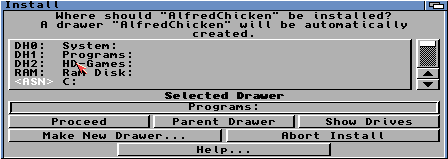
11. Click 'Proceed'
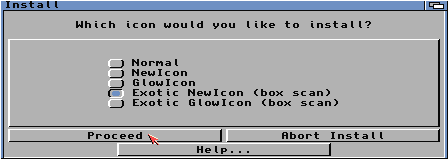
12. Select the type of icon to use (select Exotic or Non-Exotic NewIcon if you have Scalos or NewIcons installed, select Normal if you have Magic Workbench or have No Workbench enhancements installed). Once you have made your selection, click ‘Proceed’
13. When this screen shows press F12 on you keyboard. (On a real Amiga just insert Alfred Chicken floppy disk into you internal disk drive and ignore step 14)
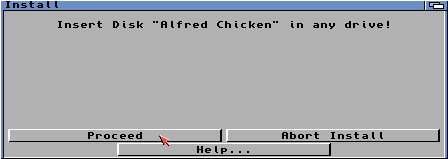
14. Now on the floppies tab select the '...' button on the DF0: slot
and select your Alfred Chicken adf. Click Open and then the OK button to return
back to emulation.
15. Now wait 5 seconds, if the copying of files does not begin
automatically then click ‘Proceed’ when Alfred Chicken disk icon shows on the
Workbench desktop screen.
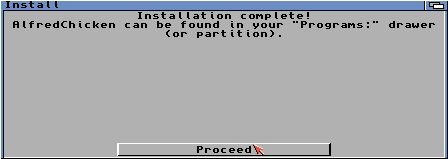
16. When this window shows, click 'Proceed' to end the Install.
17. Now close all open windows and remove the Floppy disk in your real
Amiga or Press F12 and click eject on the floppies tab to eject the adf image.
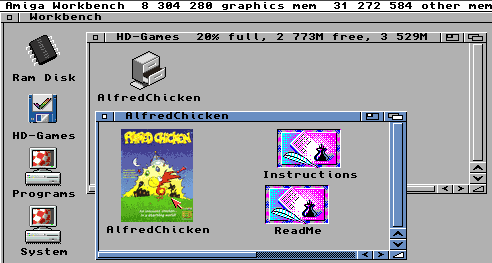
18. Double Click HD-Games
19. Double Click the AlfredChicken drawer
20. Double Click AlfredChicken Icon to run the game.
For more information about WHDLOAD please see Cody's WHDLoad FAQ
|
|
All chapters only on this page are Copyright (c) Paul, The Green Amiga Alien and should not be copied, altered or uploaded to another site without the authors permission. Web site design Copyright (c) CPC464.